Right after I got done with the C-46 I quickly got going on another Airfix favorite of mine: the Cessna O-1 Bird Dog. My original one was built in 1976, and I have strong memories of taking it with me to an overnight stay at a hotel in Los Angeles for a wedding my family and I attended. I painted that original one O.D. with South Vietnamese Air Force markings like the cover art. But for this rebuild I chose to model the USAF version in semi-gloss light aircraft gray. Humbrol 166 was the perfect color for it. For such a small model, it took me a long time to build mainly because Humbrol paints take forever to dry, and I had to do a lot of re-touching to correct errors. It's a fun little model to have again, and brings back memories of that trip to L.A. with Elton John & Kiki Dee's "Don't Go Breakin' My Heart" playing on the car radio.
Tuesday, November 12, 2013
Thursday, November 7, 2013
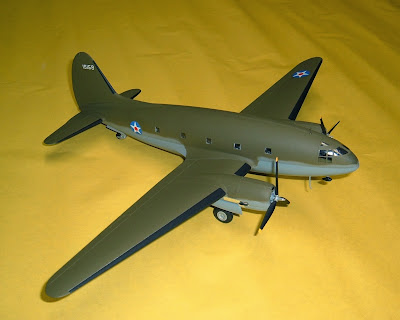
Williams Bros. C-46 Commando Early USAAC Version
 I've mentioned several times throughout this blog that I rarely saved enough money when I was a kid to buy the more expensive, challenging model airplane kits. The Williams Bros. C-46 is an exception. I wanted it badly in 1977, and one day that year I finally had enough cash to plunk down and get it. I was still in my pre-airbrush, fine-finishing days, and that first C-46 looked, well, not so good. I used Testors silver to make the all-metal 1944 version and it had lots of streaks. That plus the some of the advanced construction requirements such as having to cut out the landing gear doors from the main lower wing half piece was a bit past my skill level. But, it was a prized model in my collection for years afterwards.
For this rebuild, I chose to do the early U.S. Army Air Corps version. In fact, the decals provided for this version by Williams Bros. replicate the first C-46 delivered to the Army in 1942. I'm a sucker for early versions of airplanes because they represent an original idea, and often look much cleaner over later versions which tend to have more stuff having from them such as antennae, bulbous radomes, and gangly weapons pods. To do this for the C-46 model, one has to scrape off the stiffeners on the rear fuselage below the vertical stabilizer. The easy parts however are the navigation dome on top of the fuselage can be ignored, antennae are at a bare minimum, and you don't have to drill out the gun ports on the side windows.
I came close to airbrushing this model because Testors does not make Neutral Gray in a spray can. I did however find some made by Tamiya. So I sprayed the underside with the Tamiya Neutral Gray, then masked the lower surface with paper cut to shape, and raised ever so slightly from the model surface with yellow tack tape, then sprayed Testors Olive Drab on top surfaces. The result is as good as I could have done with an airbrush. I only had to clean up a few spots of O.D. overspray. The brilliant thing was, the Tamiya gray is a lacquer, so a Q-Tip lightly soaked in enamel thinner cleanly wiped away the O.D. without affecting the gray one bit.
When set next to the other Williams Bros. kits such as the Boeing 247 and the B-10, one quickly realizes what a huge airplane the C-46 really is. I remember seeing the one on display at the Pima County Air Museum in Tucson, Arizona for the first time. When I walked into the hangar, I was immediately stuck by the huge size of the Commando. I'm glad to have this large scale model back on display in my collection.
Subscribe to:
Posts (Atom)


